Wednesday, June 24, 2009

why am I getting spam from myself, do I have a virus?

Sometimes, you may see spam where the sender's address is your own. 99.9% of the time, this email did not come from you - but a spammer forging (also known as spoofing) your address. Forging/spoofing is popular among spammers because it can be difficult for some spam filters to deal with.

Unfortunately, email is insecure and very exploitable. The standard for email was designed in the late 60s and early 70s, long before spam and other types of abuse existed or were even thought of. Today, we live with the repercussions of the insecurity and exploitability of the original designs of the email standard. We can't fix the holes/problems without redesigning the email standard and necessarily upgrading every email server on the internet at the same time. It's a monumental and impossible task to upgrade every server at the same time, so we live with the problems.

So what can we do about emails with forged/spoofed senders? The short answer is to upgrade spam filters with those that are capable discering between spoofed and non-spoofed emails. Typically, these filters rely on SPF - but we'll never resolve this problem until SPF becomes required or the standard is redesigned. I'm not holding my breath for that.
Monday, June 15, 2009

steps on creating a new user

1) create user account (and if necessary, mail account if done separately)
2) adjust user profile script and home folder, if necessary
3) put user on appropriate distribution lists
4) log into computer as user
5) confirm drives mapped correctly
6) set up Outlook with appropriate archiving
7) add Bcc to view when composing new message
8) set up printers or confirm printers mapped correctly
9) make sure user has appropriate local permissions on computer (admin or standard/restricted)
10) confirm computer has latest updates/patches for OS and Office
11) confirm antivirus is up to date
12) configure default printer
13) configure VPN if needed
14) leave intro sheet for new user

Tuesday, June 9, 2009

dealing with Dell Control Point

On Dell's E series of Latitude laptops, Dell Control Point is installed.  It's designed to manage network connections and power settings.  Unfortunately, it blows.  When setting up an E series laptop yesterday, I found connecting to WLAN and WWAN networks more complex using DCP than traditional means.  And they were the only means of controlling WLAN and WWAN connections.

Here's what I did:

I uninstalled Dell Control Point.  

The laptop had a Verizon 5720 WWAN card in it.  Listed in the downloads for that model of laptop in the communications category was a driver for it - and it included a program for connecting it.

For the Intel WLAN card, I had to go to the downloads section and download a driver for that, too - which of course included the stupid Intel utility, which we know how to disable from here.  But as stupid as it was, the Intel driver was already on the laptop (just not the Intel utility and the Windows utility was telling me that another program was controlling it - so I decided to install the Intel utility to tell it to have Windows control the WLAN card).  And the Dell driver I downloaded was older than the driver already on the laptop.  So I had to go to the Intel site to download the driver - and then I was able to download it and then set it to have Windows manage the WIFI.  

That's how I got rid of Dell Control Point.

Monday, June 1, 2009

How to use Windows to manage Wi-Fi instead of Dell utility


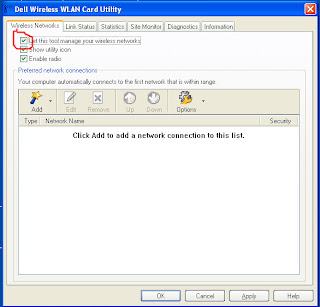
If you have a Dell wireless adapter, it may be that the Dell wireless utility is controlling which wireless networks.  I always prefer the Windows utility.  Here is how you change that.

Double click on the icon below:


Then uncheck the box next to "let this tool manage your wireless networks."


How to use Windows to manage Wi-Fi instead of Intel utility

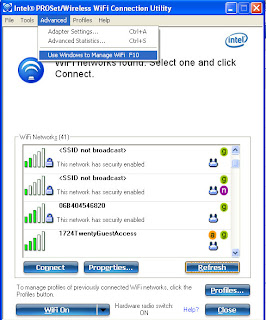
If you have an Intel wireless adapter, it may be that the Intel wireless utility is controlling which wireless networks.  I always prefer the Windows utility.  Here is how you change that.

Double click on the icon below


Then choose Advanced -> Use Windows to Manage WiFi.