Wednesday, December 21, 2016

Setting Up Two Factor Authentication in Office365

This post will go over the steps a person will need to take in setting up two factor authentication for Office365.  As of 2016, two factor authentication is the the most common option for secure access to cloud based systems.

Step 1: Ask your administrator to enable two factor authentication (can only be enabled by an administrator)

Step 2: Go to https://account.activedirectory.windowsazure.com/profile/

Step 3: Log in with your email address


Step 4: Click Set up now


Step 5: Set up the second authentication method.  For 99% of people, this will be a text message to your cell phone


Step 6: Click Contact me.  You'll a code sent to your cell phone.  Enter that code on the next page to verify successful receipt of the code.  Click Verify after entering the code.


Step 7: Click Done (you can ignore the other text in the window)


Step 8: Click Additional Security Verification


Step 9: Confirm that the settings look right (they should look right if you've gotten this far)


Step 10: Click on "app passwords"


Step 11: Click Create


Click 12: Give the name to the app password you're creating.  With near certainty, the first one you'll want to create will be for Outlook.  You'll be creating an app password for *each* non-web based program/device you use.  You cannot reuse app passwords.  Let's say you've got a tablet, a phone, two different Outlook installations (on two different computers), and a Skype for Business installation.  That's five different programs and you'll need five separate app passwords.  I recommend naming each app password for the program you'll be using.  For example, you might call them Outlook laptop, Outlook desktop, iphone 7, Galaxy S7, iPad, Skype for Business, or something similar.


Step 13: Use the app password the system gives you and track it.  Within the next two hours, your devices (Outlook or phone or tablet etc) will prompt you for a password for your email account.  Instead of using your regular password, you'll use the app password.  You *cannot* reuse app passwords, so you should be sure to 1) make as many passwords as you need and 2) track them until you first use them (the app passwords are useless after you first use them).


Thursday, December 15, 2016

Windows 10 Upgrade tips when the upgrade process fails

My last two Windows 7 to Windows 10 upgrades have not gone smoothly.  In each case, I was running the Windows 10 upgrade for users who use the accessibility features of Windows located here:
https://www.microsoft.com/en-us/accessibility/windows10upgrade

Here are the steps I take if the computer is stuck at 0% installing Windows 10 or stops anywhere before finishing.


  1. Create a batch file with the content below and run the file as administrator
  2. Update all drivers on the machine - particularly the video card driver
  3. Make sure the C drive has at least 40 GB free
  4. run "sfc /scannow" from an elevated DOS prompt
  5. Remove any third party antivirus
  6. Log in as a user with a minimal profile
  7. Go to msconfig and under services, hide all Microsoft services and then disable all services (which will leave all MS servers enabled)
  8. Remove the computer from the domain and log in with a brand new profile with admin privileges,  

Batch file contents:


net stop wuauserv
net stop bits
net stop cryptsvc
net stop trustedinstaller
sc config cryptsvc start= auto obj= "NT Authority\NetworkService" password= a
sc config wuauserv start= auto obj= LocalSystem
sc config bits start= delayed-auto obj= LocalSystem
Sc config trustedinstaller start= demand obj= LocalSystem
Sc config eventlog start= auto
reg add HKLM\SYSTEM\CurrentControlSet\Services\wuauserv\Parameters /v ServiceDll /t REG_EXPAND_SZ /d "%systemroot%\system32\wuaueng.dll" /f
reg add HKLM\SYSTEM\CurrentControlSet\Services\bits\Parameters /v ServiceDll /t REG_EXPAND_SZ /d "%systemroot%\system32\qmgr.dll" /f
reg delete HKLM\SOFTWARE\Policies\Microsoft\Windows\WindowsUpdate /f
reg delete HKLM\COMPONENTS\PendingXmlIdentifier /f
reg delete HKLM\COMPONENTS\NextQueueEntryIndex /f
reg delete HKLM\COMPONENTS\AdvancedInstallersNeedResolving /f
sc sdset wuauserv D:(A;;CCLCSWRPLORC;;;AU)(A;;CCDCLCSWRPWPDTLOCRSDRCWDWO;;;BA)(A;;CCDCLCSWRPWPDTLOCRSDRCWDWO;;;SY)S:(AU;FA;CCDCLCSWRPWPDTLOSDRCWDWO;;;WD)
sc sdset bits D:(A;CI;CCDCLCSWRPWPDTLOCRSDRCWDWO;;;SY)(A;;CCDCLCSWRPWPDTLOCRSDRCWDWO;;;BA)(A;;CCLCSWLOCRRC;;;IU)(A;;CCLCSWLOCRRC;;;SU)S:(AU;SAFA;WDWO;;;BA)
sc sdset cryptsvc D:(A;;CCLCSWRPWPDTLOCRRC;;;SY)(A;;CCDCLCSWRPWPDTLOCRSDRCWDWO;;;BA)(A;;CCLCSWLOCRRC;;;IU)(A;;CCLCSWLOCRRC;;;SU)S:(AU;FA;CCDCLCSWRPWPDTLOCRSDRCWDWO;;;WD)
sc sdset trustedinstaller D:(A;CI;CCDCLCSWRPWPDTLOCRSDRCWDWO;;;SY)(A;;CCDCLCSWRPWPDTLOCRRC;;;BA)(A;;CCLCSWLOCRRC;;;IU)(A;;CCLCSWLOCRRC;;;SU)S:(AU;SAFA;WDWO;;;BA)
sc sdset eventlog D:(A;;CCLCSWLOCRRC;;;AU)(A;;CCDCLCSWRPWPDTLOCRSDRCWDWO;;;BA)(A;;CCLCSWRPWPDTLOCRRC;;;SY)S:(AU;SA;DCRPWPDTCRSDWDWO;;;WD)(AU;FA;CCDCLCSWRPWPDTLOCRSDRCWDWO;;;WD)
takeown /f %systemroot%\winsxs\pending.xml
icacls %systemroot%\winsxs\pending.xml /grant Administrators:(F)
icacls %systemroot%\winsxs\pending.xml /grant Administratörer:(F)
del /q %systemroot%\winsxs\pending.xml
ren %systemroot%\System32\Catroot2 oldcatroot2
ren %systemroot%\SoftwareDistribution SoftwareDistribution.old
rename \ProgramData\Microsoft\Network\Downloader Downloader.old
cd /d %windir%\system32
regsvr32.exe atl.dll /s
regsvr32.exe urlmon.dll /s
regsvr32.exe jscript.dll /s
regsvr32.exe vbscript.dll /s
regsvr32.exe scrrun.dll /s
regsvr32.exe msxml3.dll /s
regsvr32.exe msxml6.dll /s
regsvr32.exe actxprxy.dll /s
regsvr32.exe softpub.dll /s
regsvr32.exe wintrust.dll /s
regsvr32.exe dssenh.dll /s
regsvr32.exe rsaenh.dll /s
regsvr32.exe cryptdlg.dll /s
regsvr32.exe oleaut32.dll /s
regsvr32.exe ole32.dll /s
regsvr32.exe shell32.dll /s
regsvr32.exe wuapi.dll /s
regsvr32.exe wuaueng.dll /s
regsvr32.exe wups.dll /s
regsvr32.exe wups2.dll /s
regsvr32.exe qmgrprxy.dll /s
regsvr32.exe wucltux.dll /s
regsvr32.exe wuwebv.dll /s
net start eventlog
net start cryptsvc
net start bits
net start wuauserv
fsutil resource setautoreset true c:\
netsh winhttp reset proxy
bitsadmin /reset /allusers
wuauclt.exe /resetauthorization /detectnow
:MESSAGE
echo+++++++++++++++++++++++++++++++++++++++++++++++++++++++++++
echo===========================================================
echo     The commands has been succesfully executed. Hit enter to continue
echo===========================================================
echo+++++++++++++++++++++++++++++++++++++++++++++++++++++++++++
Pause > Null
:end


Friday, October 28, 2016

How to completely uninstall Google Apps Sync for Microsoft Outlook (GASMO)

This post will talk about how to completely uninstall Google Apps Sync for Microsoft Outlook (hereafter referred to as GASMO).

You might want completely uninstall GASMO for several reasons.  If you're experiencing instability in Outlook, creating a new GASMO profile is typically the first step by re-running "Set up a Google Apps Sync user" and then setting the new profile as the default.  Should the new profile prove to be unstable, sometimes you need to completely remove GASMO.

Here is how I do remove GASMO completely.

Close Outlook
Uninstall GASMO via add/remove programs.
Delete the folder C:\Program Files (x86)\Google\Google Apps Sync
Delete the folder C:\Users\%username%\AppData\Local\Google\Google Apps Sync

Monday, October 3, 2016

Step by step - restore active directory objects from Windows backup

I accidentally deleted some active directory objects when I was deleting some Exchange mailboxes.  Chaos ensued, but I had to restore the active directory users.

Here's what Microsoft helped me do (step by step).

Boot into Directory services restore mode.  (see here for how: https://blogs.technet.microsoft.com/activedirectoryua/2008/11/20/how-to-start-in-directory-service-restore-mode-dsrm-in-windows-server-2008-and-windows-server-2008-r2/)

Log in

Open an elevated command prompt

type "wbadmin get versions"
This will give you all the backups that you can restore from.
Pay attention to the version identifier as this will define what backup you're working with.

type "wbadmin start systemstaterecovery -version:10/01/2016-04:30" where 10/01/2016-04:30 will vary based on the actual version that you are restoring from that you found when you ran "wbadmin get versions"

Choose yes twice.


Now, you'll need to wait 45 to 90 minutes while the system preps itself.  Ugh.

Next, you'll restore organization units (OUs) as a whole to the version the the OUs were at the time of the backup.  So for example, if I have an OU named accounting and I'm doing a restore on October 3, 2016 where the backup I'm restoring from is October 1, 2016 - all changes from 10/1/16 to 10/3/16 will be lost.

This gets less intuitive here.  After the system has loaded the backup, the system will ask you to reboot the server.  Don't do it.


Instead, launch a command prompt, type ntdsutil, and then press Enter.
1 .           Type activate instance ntds and press Enter.
2.            Type authoritative restore and press Enter.
3.            At this point, determine whether you're restoring an OU or an object. The previous table showed the syntax to restore either an OU or an object. Type the restore command and press Enter.
For example, to restore a user object, use the following format:
•             restore object dn
•             restore object "cn=Sally,ou=sales,dc=pearson,dc=pub"
Or, to restore an OU, use the following format:
•             restore subtree dn
•             restore subtree "ou=sales,dc=pearson,dc=pub"
NOTE
This increments the update sequence number (USN) so that all other DCs consider it the most recent change.
4.            Type quit and press Enter twice to exit ntdsutil.
5.            Restart the DC normally.

As an example. if you were restoring an OU called distribution groups which sits under an OU called MyBusiness, you'd type:

restore subtree "OU=distribution groups,OU=MyBusiness,DC=contoso,DC=local"
if you're not familiar with LDAP syntax (which I'm not), some googling and trial and error will help you find what you need.  If you type in the wrong values, the process willl just fail.


This is what a successful restore looks like.  Look at "successfully updated records"

What's weird for me in the two times I've tried this is that I rebooted once, and my 2008 R2 server had no internet connectivity and no restored AD items on first reboot.  I had reboot again to get my items and to get internet connectivity.  So weird.

Configuring VPN to work without regard to dial in policy

Per this page:

https://technet.microsoft.com/en-us/library/cc732252%28v=ws.10%29.aspx?f=255&MSPPError=-2147217396


  1. Click Start, click Administrative Tools, and then click Network Policy Server. The NPS console opens.
  2. Double-click Policies, click Network Policies, and then in the details pane double-click the policy that you want to configure.
  3. In the policy Properties dialog box, on the Overview tab, in Access Permission, select the Ignore user account dial-in properties check box, and then click OK.


You can enable NPS (Network Policy Server) to work without regard to the user's dial-in setting.  For years, I've been manually marking people with Allow for Dial-in as in below.


Thursday, September 29, 2016

Windows 10 Anniversary Update download location

Since it seems to take me 30 seconds to wade through various pages to find the Windows 10 anniversary update, I'm documenting the best link here:

http://go.microsoft.com/fwlink/?LinkID=823759

Wednesday, September 28, 2016

SSL certificate errors on Outlook for Mac caused by Outlook bug

Outlook 2016 for Mac has a bug in it that causes Outlook to show a security error when connecting to an Exchange server even when the Exchange server and all parts are properly configured.  This post will talk about what the error looks like and how to make the error disappear.

When opening or configuring Outlook for Mac that connects to an Exchange account, users will get an error like this:


You can hit "continue" to get through the error, but to remove the error forever more . . .

Hit "Show Certificate"
Check the box for "Always trust"
Hit Continue
Enter your password at the prompt that comes up.


Friday, September 23, 2016

Moving Quick Parts from one computer to another

I have one client who loves Quick Parts (preformatted sections of text you can insert into the body of an email in Outlook).  I'm documenting how to move those Quick Parts from one computer/profile to another.

The Quick Parts are stored in Normalemail.dotm

You can simply move that single file from profile to profile or computer to computer from the standard location overwriting the default normalemail.dotm).  The default location is:
 
c:\users\%username%\appdata\roaming\microsoft\templates


Sunday, September 18, 2016

Removing email proxy addresses from AD (helpful if you sync your AD to Office365)

Right now, this is a partial post while I get the PowerShell scripting components together. I needed to remove all the proxy addresses for a certain domain in advance of removing that certain domain from our Office365 account. Because we sync our local AD with Office365, I need to remove the proxy addresses from the local AD.  I could do this manually, of course - which is long and inefficient.  The crucial command I used is this one:

Set-ADUser username -Remove @{ProxyAddresses="smtp:username@domain.com"}

I ran this from "Active Directory Powershell for Windows PowerShell"


Because I'm not good enough with PowerShell yet, here's what I did.  I tried to remove the domain from the account in Office365.  Office365 returned all the mailboxes that had the domain as aliases.  I copied and pasted the list of mailboxes to Excel.  I extracted the mailbox user names from the list and made a single column in Excel of those mailbox names (in my case - our domain uses a username of joe.smith as the username for Joe Smith) so the single column included Joe.Smith.  Then I did a mail merge with that list to create a get that PowerShell command listed above to be individualized with each username.  And then I copied and pasted those commands into PowerShell.  Not ideal.  Ideally, you'd have a foreach command that would run though all AD users, but this is a story about what I did at this moment.  I'll update this post.


Friday, September 16, 2016

update rollups for Windows 7 or other OSes (convenience updates)

If (for some reason) Windows update isn't working, which oddly I've seen a couple times in the last week when I needed to update Windows 7 in advance of a Windows 10 update (the checking for updates progress bar just cycles and cycles for hours) . . .

You can install update via a "convenience" update.

As an example, here's a convenience update for convenience update for Windows 7 and Windows 2008:

https://support.microsoft.com/en-us/kb/3125574

Before installing the update, install the April 2015 servicing stack update from here:
https://support.microsoft.com/en-us/kb/3020369

Also - you may need to stop the "Windows Update" service so that the convenience update does not try to check for existing updates since the Windows Update service has already shown instability.

Sunday, September 4, 2016

Group policy changes to enable ping response and remote desktop (and remote desktop firewall exception)

I recommend these changes on Windows domains to enable ping/ICMP responses from domain connected computers and remote desktop enabling (with network level authentication) and a remote desktop exception on the firewall.  Not all of these items are default on Windows 10 and/or Group Policy.  I think these are best practices so here is how you can add them to Group Policy.

Open Group Policy Management on a domain controller.  Right click on default domain policy and choose edit.


Enable ping responses via Computer Configuration -> Policies -> Administrative Templates Policy -> Network -> Network Connections -> Windows Firewall -> Domain Profile and enable Windows Firewall: Allow ICMP exceptions


Choose the option for "allow inbound echo request."


To enable a remote desktop firewall exception, in the same location, change "Windows Firewall: Allow inbound Remote Desktop exceptions"


To enable network level authentication, go to:
Computer Configuration\Policies\Administrative Templates\Windows Components\Remote Desktop Services\Remote Desktop Session Host\Connections

Enable "Allow users to connect remotely by using Remote Desktop Services"


To make all remote desktop connections use network level authentication, go to:
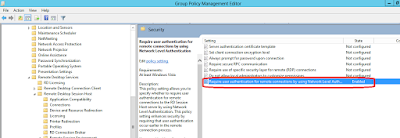
Computer Configuration -> Policies -> Administrative Templates -> Windows Components -> Remote Desktop Services -> Remote Desktop Session Host -> Security

Enable "Require user authentication for remote connections by using network level authentication"


Tuesday, August 23, 2016

Upgrading to Windows 10 after 7/29/16

There is a workaround to get the Windows 10 upgrade on PCs after Microsoft's 7/29/16 deadline.  Per this article from Howtogeek.com - the upgrade is still available for users who use "assistive technologies."  There is no validation on whether or not the computer uses assistive technologies, so in effect, the upgrade is available to everyone.

For reference, the link to the Windows 10 upgrade is here:

Tuesday, August 16, 2016

Best practices for safe user behavior to keep your account/computer from being compromised

I wish the internet was a safe place, but it's not.  There are people who want to compromise your accounts, computers, bank accounts, and credit cards.  In this post, I'll talk about ways to help keep you and your computer safe.

I separate risks into two categories:
1) User risks - these are things that you do over the course of regular use of your computer
2) Server side risks - these are parts of the your IT system that you have no control over

This blog will focus on user risks, the things you can control and should be conscious of when using your computer.  While TV and movies often focus on hackers compromising your company's server, the vast majority of IT security compromises come from everyday internet and email use.

I will list the items that you should think about in order of importance.  All items are important, but the items listed first will be more important.

  1. Backup - every computer should have a backup system and preferably one that includes off-site storage.  This protects you from A) hardware and software failure and B) bad actors who would destroy your data or hold your data for ransom (this happens).  My strong preference is a cloud based backup system like Backblaze or Carbonite.  Of the two, my preference is Backblaze at $5 per computer per month.
  2. Antivirus - all computers should have an up to date modern antivirus program (Macs included).  Windows 8 and Windows 10 come with antivirus built-in.
  3. Malware protection - I believe best practice is to have a separate program for malware detection.  Antivirus, while good, does not protect against several types of Malware.  My favorite malware program is MalwareBytes at www.malwarebytes.org at a cost of $25 per year for residential users and $50 per computer per year for business users.
  4. Complex passwords - all passwords should be at least eight characters with at least one letter, one number, and one special character.
  5. Turn on multi factor authentication - As of 2016, many email providers offer a two factor or multi-factor authentication.  To minimize the chance of your email being compromised, you can turn on two factor or multi-factor authentication.  When turned on, your email system will send you a text message to your cell phone to verify you any time you access your email from a new computer.  Some people find this annoying, but it is a secure way to make sure your account does not get compromised.
  6. Safe email behavior - Users should never open an attachment or link in an email unless they are 100% sure they are confident that the attachment or link is safe.  Your IT person can often help you figure out if a link or attachment is safe if you are not sure.
  7. Avoid sending private information over standard email - Standard email traffic is not encrypted, and it is safe to assume that all the emails you send and receive can be viewed by other parties.  There are ways to send encrypted email, but encrypted email is not standard and needs to be set up by your email administrators.
  8. Safe web behavior - Even innocuous Google searches can return virus laden links.  Before clicking on any link in a web browser, be sure to verify that you are visiting the site you intend.  You might think you're going to a restaurant of movie review, but you might end up in another location.  Make sure when you look at search results that the address of the page you're visiting matches the name of what you are looking for.
  9. Avoid illegal software - Downloading software from questionable sites can create trouble.  Often this software is loaded with what we call "bloatware."
  10. Ignore virus warnings from web browsers - For many years, unethical people have created "fake alert viruses."  In your web browser (Firefox, Chrome, Internet Explorer, Edge, Safari, etc), a window opens up telling you that you have a virus and to click on the page to remove the virus or to call a phone number.  If the warning comes a page web page, this is a false message trying to get you to take action that will infect you.
  11. Ignore unsolicited phone calls - As of 2016, users sometimes get unsolicited phone calls from "Microsoft" or "Comcast" saying that your computer is infected and they want to help you.  This is a scam.  There is no such concept as a central authority somewhere keeping track of your phone number and computer status.  

If you have any questions, please contact your IT people.  They are the best resource for help staying safe.

Friday, August 12, 2016

Moving autocomplete files between profiles on Outlook 2010/2013/2016

This is the process I use for moving autocomplete data from one profile to another profile when you don't have an Exchange server.  This is applicable for Outlook 2010/2013/2016.

First, send an email from the new mail profile and note the time/date when you sent the email.  This time/date will be important shortly.

Now, go to:
c:\users\%username%\appdata\local\microsoft\outlook\roamcache

You're looking for two autocomplete files.  Both files start with stream_autocomplete . . .

You're looking for one stream_autocomplete file with the time/date when you sent the email just now.
You're also looking for the stream_autocomplete that is much larger and represents the autocomplete for the old profile (this will be a file between 10 KB and 5000 KB) with a time/date that corresponds to the last time you sent an email from the old profile.

We'll call the new file "new_autocomplete" and the old file "old_autocomplete" going forward.

Open Outlook.  Put Outlook offline.

in c:\users\%username%\appdata\local\microsoft\outlook\roamcache . . .

Copy and paste old_autocomplete so you have old_autocomplete and old_autocomplete_copy.

Highlight new_autocomplete and choose rename.  Hit control C so you have the name of new_autocomplete in your clipboard.  Add a single letter to the end of new_autocomplete so new_autocomplete now has a new name.

Highlight old_autocomplete_copy and choose rename.  Paste the name you have on your clipboard.  Now, your copy of old_autocomplete will have new_autocomplete's name.

Close Outlook.
Wait 30 seconds
Reopen Outlook.
Put Outlook onlne.

Test autocomplete.

That's it.

Tuesday, August 9, 2016

Creating an anti-spoofing rule in Office365

Here's how to create a mail flow rule in Office365 to send spammers who spoof your domain to the online quarantine.  These instructions are applicable ass of 8/9/16.  Typically, these spoofed messages will go to your users' junk e-mail boxes, but this can still lead to confusion, so we don't want these messages to go to junk e-mail at all.

In the Exchange Admin Center, go to Mail Flow:


Add a new mail flow rule:


Hit More Options near the bottom of the page:


Give the rule a name of "Spoof Check."  Tell the rule to apply this rule if sender is outside of the organization and the sender's domain is [your public domain] and do the following: deliver the message to the hosted quarantine.


Tuesday, July 26, 2016

log on as a service is greyed out on domain connected computers

I found Log on as a Service to be greyed out in local security policy for my domain member server (running Win 2008 R2).  It looked like this:


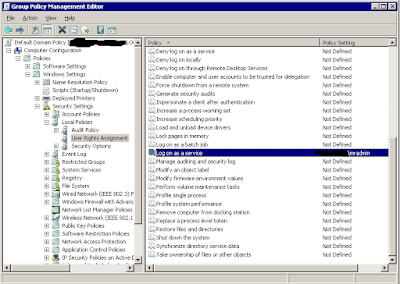
It is greyed out because the setting is defined in group policy management by a domain controller and not in local security policy.  I was able to edit the setting here on a domain controller here:

In my case, I had to log on to one of my Windows 2008 R2 domain controllers and open Group Policy Management and go to Default Domain Policy where I could go to edit the log on as a service for the entire domain.

The setting is located here:


And editing the value looks like this (right click on default domain policy and choose edit):


Saturday, July 2, 2016

Downloading Acrobat 9 updates now that Acrobat is no longer actively supported

Acrobat 9 (Standard or Pro) will no longer download updates automatically from version 9.0.0 at least that was my experience on 6/30/16.  Acrobat 9 is no longer supported by Adobe.  Luckily, I found this page:
http://khkonsulting.com/2014/08/where-are-my-adobe-acrobat-9-updates%E2%80%BD%E2%80%BD%E2%80%BD/#comment-306225

The page explains that while the autodownload function no longer works, you can manually download the updates from here:
PC - ftp://ftp.adobe.com/pub/adobe/acrobat/win
Mac - ftp://ftp.adobe.com/pub/adobe/acrobat/mac

I found that when I got to about version 9.3.5, the autoupdate feature *did* work, but the autoupdate feature definitely did not work on version 9.0.0.

Friday, June 17, 2016

Configuring Outlook with a Google account (Google settings change needed after July 2014)

You need to an adjustment to your Google settings to get Google email working in Outlook.  I got this message when trying to set up a Google account in June 2016:

Your IMAP server wants to alert you to the following: Please log in via your web browser:
http://support.google.com/mail/accounts/bing/answer.py?answer=78754 (Failure)


The link above doesn't help as far as I can tell.

I got the answer from Microsoft's site:
https://support.microsoft.com/en-us/kb/2984937

On 7/15/14, Google disabled basic authentication, so you need to enable basic authentication to get Outlook (or Apple Mail or others) to successfully authenticate with Google accounts.

You can enable basic authentication here (assumes you are logged into your Google account):
https://www.google.com/settings/security/lesssecureapps


Thursday, May 19, 2016

Using DISM to repair WIndows when sfc /scannow can't repair Windows 10

I have found that sfc /scannow doesn't repair system files on Windows 10 in many cases.  Sfc /scannow will find problems but not repair them.

I have found a fix that won't work for the average user - only sysadmins with access to a Windows 10 ISO.

Here's what I did:


  • Downloaded the Windows 10 Pro 64 bit version 1511 ISO from "Microsoft Volume Licensing Service Center" - this 4 GB file will take a while to download
  • Mounted the ISO file as d:
  • Ran this command from an elevated command prompt:
    DISM /Online /Cleanup-Image /RestoreHealth /source:WIM:d:\Sources\Install.wim:1 /LimitAccess
  • Re-ran "sfc /scannow" after the DISM command above finishes

Thursday, April 14, 2016

Using Windows 10 search to pull up Outlook emails in the Windows search interface

This post will discuss getting emails to appear in the Windows 10 search interface *if* you are using Start10 or some similar start menu program.

I was working with a user who had Windows 8 and Office 2010 installed.  The user had Start8 installed as the Windows 8 interface stinks.  The user often ran searches via clicking Start and then typing search terms and hitting "See More Results" just like you can/could do in Windows 7.  When clicking "See More Results" - the results included emails from Outlook.  This was the critical behavior we wanted to keep (getting emails in the search results).

You'd get to the needed searches like this:


I upgraded the user's laptop to match our current software setup - Windows 10 and Office 2013.  For this executive user, I also installed Start10 (not part of my standard install).  

The bright side was that the user could still click on "see more results" and get files or emails, but the problem was that the user would double click on the emails and get nothing (no error or ability to see the message).  I'm 95% sure I could have fixed the problem right then and there via deleting the file C:\Program Files\Common Files\System\MSMAPI\1033\MSMAPI32.DLL - but I wasn't sure about that fix until later.  You can delete that MSMAPI32.DLL file with Outlook closed and the file Outlook will recreate the file on next open (credit for that info here).

My assumption was that the indexing was broken.  The search was pulling up indexed results that didn't point to the underlying issue.  I rebuilt the index.  No dice.  Same problem.  I could see the searches, but the user could not double click on the emails and get Outlook to open them.  

I then upgraded to Office (and Outlook 2016) assuming that it was some way in that Windows 10 was having trouble talking to Outlook 2013.  With installation of Outlook 2016, emails would not appear in the "see more results" entries.  I later learned that Microsoft says they have disabled the feature that made Outlook results appear in Windows searches.  Supposedly, MS disabled this feature for both Outlook 2013 and Outlook 2016, but my experience says that Outlook 2013 still works.  

If I could go back in time, I'd reinstall Outlook 2013, but in this case - I uninstalled Outlook 2016 and installed Outlook 2010.  I had to delete the OST and let the OST rebuild.  While I was at it, I rebuilt the index for best info for the user.

Things are great, right?  Not true.  I run a search, and I get emails among the search results, but I get an error of "Either there is no default mail client or the current mail client cannot fulfill the messaging request. Please run Microsoft Outlook and set it as the default mail client."  I tried the MS FixIt and deleting the registry entries for both 32 bit and 64 bit as described in the excellent troubleshooting steps here:

However, no dice.  I also tried to set Outlook as the default program via Set Program Defaults in Windows 10.  No dice.  The eventual fix was to delete C:\Program Files\Common Files\System\MSMAPI\1033\MSMAPI32.DLL with Outlook closed.  Upon Outlook reopen, the file recreated itself (different size and date) and the ability to click on emails found in search was successful.

Thursday, February 25, 2016

Lost password recovery on Windows 7 (free)

I was handed a laptop with Windows 7 Pro and a single user on the laptop with an unknown password.  I had a 1 GB flash drive.  Ideally, I would have had a 8 GB or larger USB drive that I could put a Windows 7 installer on, but I didn't (would have saved me from needing Linux).

These steps require medium level tech savvy.  If you've never worked in a DOS prompt before or don't know what that means, you won't have much luck with these steps.

Here's what I did step by step:

On another laptop, I did these things:
Downloaded Linux Live USB Creator from here: http://www.linuxliveusb.com\
Downloaded System Rescue CD from here: http://www.system-rescue-cd.org/Download
Made a bootable System Rescue CD on the 1 GB USB flash drive

On the laptop with the unknown password, I ran these steps:
Booted to the Linux distro we put on the USB drive
Started the default Linux version when presented
ran "startx" to start the GUI
opened up a terminal/CLI prompt
ran mount -t ntfs-3g /dev/sda1 /mnt/windows
** note that /sda1 might not be the location of your C drive where Windows is located, might be sda2 or sda3
ran cd /mnt
ran cd windows
** note that windows is case sensitive so it might need to be "cd Windows"
ran cd system32
** note that system32 is case sensitive so it might need to be "cd System32"
ran mv utilman.exe utilman.bak
ran cp cmd.exe utilman.exe
reboot the computer back into Windows
At the login screen, hit Windows key + U
at the DOS prompt, run "net user USERNAME PASSWORD" where USERNAME is the name of the user and PASSWORD is the new password

** of note if you run just "net user" from a DOS prompt, you'll be presented with the existing usernames on the computer

Thursday, January 14, 2016

Creating a battery health report

I found that this command will generate an HTML file that will let you know the health of a battery:

for Windows 7:
powercfg -energy

for Windows 8 and 10:
powercfg /batteryreport

Both need to be run in an elevated command prompt.

You'll get an HTML report that may or may not be able to be opened from where it is stored.  When you open the file, if you scroll to near the bottom, you'll see an area labeled "Battery:Battery Information."  Here's what my "Battery:Battery Information" looks like on my 10 month old laptop:

Battery:Battery Information
Battery ID 1153SanyoDELL YDN874C
Manufacturer Sanyo
Serial Number 1153
Chemistry LiP
Long Term 1
Design Capacity 52592
Last Full Charge 51520


In this case, I see that the capacity of the battery is 52592, but its last *full* charge was only 51520.  So if I divide 51520 by 52592, I get 97.962% - so my battery is nearly 98% healthy.  This means my battery is in great health, whereas most older batteries will be much lower.

Credit for this information goes to these two locations:
http://www.helpwithwindows.com/Windows7/Check-your-laptop-battery-health-in-Windows-7.html
and
http://www.howtogeek.com/217010/how-to-generate-a-battery-health-report-on-windows-8-or-windows-10/