Showing posts with label copier. Show all posts

Sunday, August 10, 2014

Using a Windows Server as an authenticated relay server to Office365

If you've got an on-premise device that doesn't support TLS and you're on Office365 (or other outsourced Exchange), you're in a bind.  Most of the info here comes from this article:

http://www.configureoffice365.com/configure-office-365-smtp-relay/

I'm copying and pasting parts of it below, simplifying parts, and adding my own hints.  This presumes Windows Server 2008.  Some Windows 2012 steps are here.

Part 1 - Add IIS if not already installed

  1. In Server Manager, select Add Roles.
  2. On the Select Server Roles page, select Web Server (IIS) and select Install.
  3. Select Next until you get to the Select Role Services page.
  4. In addition to what is already selected, make sure that ODBC Logging, IIS Metabase Compatibility, and IIS 6 Management Console are selected and then select Next.
  5. When you’re prompted to install IIS, select Install. You may need to restart the server after the installation is finished.
Part 2 - Install SMTP

  1. Open Server Manager and select Add Features.
  2. On the Select Features screen, choose SMTP Server. You may be prompted to install additional components. If that’s the case, select Add Required Features and select Next.
  3. Select Install. After the installation is finished, you may have to start the SMTP service by using the Services snap-in for the Microsoft Management Console (MMC).
Part 3 - Add TLS certificate

  1. Office 365 requires TLS encryption and for this server to use TLS, it must have a certificate installed. 
  2. In order to do this the Web Server (IIS) role and IIS Management Console must be installed (needs to be added via Server Manager -> Add Roles).  
  3. To create the self-signed certificate: (Start->Administrative Tools->Internet Information Services (IIS) Manager->Select Host->Server Certificates->Create Self-Signed Certificate)
Part 4 - Configure SMTP server relay

  1. Start->Administrative Tools->Internet Information Services (IIS) 6.0 Manager.
  2. Click on the ‘+’ next to your host name.
  3. Right-click on the [SMTP Virtual Server…] and select Properties. It’s now time to step through each of the tabs to configure the SMTP relay.
  4. General Tab: The IP address should be set to (All Unassigned)
  5. Access Tab: Click Authentication… and select the Anonymous access check box.
  6. Access Tab: Click Connection… Select ‘All Except the list below’ and leave the list below blank. This allows any device inside your firewall to access this relay.
  7. Access Tab: Click Relay… Select ‘All Except the list below’ and leave the list below blank. This allows any device inside your firewall to access this relay.
  8. Messages Tab: No changes. The default works well.
  9. Delivery Tab: Click Outbound Security… Select Basic authentication and enter the username and password that is used to send e-mail to the external server (Office 365 in this case). The user name must be a fully qualified (ex: user@companyname.com) valid Office 365 user licensed for Exchange. Check TLS encryption.
  10. Delivery Tab: Click Outbound connections… Set the TCP port to 587.
  11. Delivery Tab: Click Advanced Delivery and set the Fully-qualified domain name box to the name of the local server that is acting as the relay (ex: myserver1.domain.local). Set the Smart host the full-qualified name of the Office 365 SMTP Server (as of 8/6/14 - this is smtp.office365.com in all cases). Make sure the “Attempt direct…” box is unchecked.
  12. LDAP Routing and Security Tabs: No changes to these areas.
  13. Now there has to be a remote domain setup with the Office 365 domain name in it. Click the ‘+’ next to the [SMTP Virtual Server…] item
  14. Right-click on Domains and select New-Domain which will launch a Wizard.
  15. Select Remote and Next.
  16. Enter the name of the Office 365 vanity domain (ex: mycompany.com)
  17. Now this remote domain will be setup very similarly to the overall SMTP server. Right-click on the new domain name and select Properties.
  18. Select Forward all mail to smart host and enter the same Office 365 SMTP Server as above (ex. smtp.office365.com)
  19. Click on Outbound Security and configure the same as above. Select Basic authentication and enter the username and password that is used to send e-mail to the external server (Office 365 in this case). The user name must be a fully qualified (ex: user@companyname.com) valid Office 365 user licensed for Exchange. Check TLS encryption
  20. Repeat steps 14 through 19 where step 16 is *.com for the domain
  21. Repeat steps 14 through 19 where step 16 is *.org for the domain
Part 5 - Configure the on-premise device
  1. Configure the on-premise device (copier, phone system, etc) with the IP address for the Windows server you have been working with as the SMTP server
  2. For email address, enter the same address you entered in Part 4 step 9
  3. Use port 25 and no authentication of any kind and no SSL or any other kind of encryption
Troubleshooting tips
  • Make sure the firewall on the Windows server allows connections on port 25.  A good test is "telnet 10.0.0.18 25" where 10.0.0.18 might be the IP address of the server you're using as the relay
  • I've seen instances where the first emails can take up to 90 minutes to relay.  I cannot explain this.  But it is true.
  • As a test, try using Windows Mail or Outlook as a test mechanism.  If it succeeds through your test program, it's just a matter of configuring your device (copier, etc) properly
  • On the relay server, there can be error messages located here if things aren't coming through after 90 minutes - C:\inetpub\mailroot\Badmail
Friday, July 4, 2014

installing Postfix on Ubuntu as an internal mail server

I had a client who wanted to have an internal email server for sending outbound emails.  This email server would be used for sending scans (via scan to email) where the copier didn't support TLS and the email server required TLS and also for email blasts (where users send out mass emails via a local software program like WorldCast).

I successfully implemented Postfix running on Ubuntu.

These directions (relevant on 7/3/14) and derived from here:
https://www.digitalocean.com/community/tutorials/how-to-install-and-setup-postfix-on-ubuntu-12-04

This will allow you to configure any local mail client to send out unauthenticated emails from these subnets:
192.168.0.0
192.168.1.0
192.168.2.0
192.168.3.0

Just set the SMTP server as the with the IP address of the Ubuntu machine (preferably a virtual machine).

Create a new virtual machine with 2 GB of RAM and 30 GB of HD space.

Download and install Ubuntu Linux from here (964 MB):
http://www.ubuntu.com/download/desktop/thank-you/?version=14.04&architecture=amd64

Once installed using all logical defaults, click the search button in the top of the toolbar and type terminal and run the terminal

Run this:
sudo apt-get install postfix

During the installation, you will see a dialogue box appear, asking you which kind of installation you would prefer. Select “Internet Site”.

For domain name, enter:
domainname.com
(where domainname.com is your domain name - though in truth this is irrelevant)

Once Postfix is installed there are a few steps that need to be taken before it is fully functional.

Once Postfix is installed, go ahead and open the main configuration file.
sudo nano /etc/postfix/main.cf

There are a few changes that should be made in this file.
myhostname = domainname.com

Change this value:
alias_maps = hash:/etc/postfix/virtual
to this value:
virtual_alias_maps = hash:/etc/postfix/virtual

For the value, my networks, add a space and then this value:
192.168.0.0/22

So it looks like this:
mynetworks = 127.0.0.0/8 [::ffff:127.0.0.0]/104 [::1]/128 192.168.0.0/22

The rest of the lines are set by default. Save, exit, and reload the configuration file to put your changes into effect:

sudo /etc/init.d/postfix reload


Of note - this is an outbound only email server.  Separately, you need to make sure you can send out on port 25 (via your firewall and ISP) and that you're not violating any SPF records with this server (or you may need to adjust SPF records).  

Tuesday, July 13, 2010

allowing anonymous sending on SBS 2008 (for scan to email copiers or other devices)

I had put an SBS 2008 box in place for a client. I had to alter settings as the old mail server had allowed anonymous sending on the LAN. I tried a bunch of differnet credential combinations and ports and SSL options and none of them worked. Then I found this post, which walked me through created a receive connector that allowed anonymous senders on the IP addresses you specify.

The short version of the article.

Go to EMC.
Go to Server Configuration -> Hub Transport
Highlight your server in the top middle field and choose new receive connector on the right side
Call the connector "copier" without quotes and type is custom
Note sure if this is necessary, but add the internal FQDN in the bottom box such as contoso1.contoso.local
Leave the local network settings alone
In remote network settings, remove the existing content. Add a single entry for the IP address of the copier like 192.168.0.10)
Hit NEW.
Now, right click on the connector you just created and clear all check boxes on the authentication tab.
On the permission groups tab, check the box for anonymous users.

Then open the Exchange PowerShell and run this command:

Get-ReceiveConnector "copier" | Add-ADPermission -User "NT AUTHORITY\ANONYMOUS LOGON" -ExtendedRights "ms-Exch-SMTP-Accept-Any-Recipient"

On your copier, you can now send over port 25 without SSL and without the need for sending credentials either.

Sunday, May 2, 2010

scan to email with google mail or other off-site mail servers

I was in a pickle with a copier with a scan to email function and email hosted on google apps. No matter what I tried, I couldn't get the authentication to work. Then I found this page that talks about using hmailserver basically as a relay to gmail. I tried it, and it worked great.

Complete instructions on the hmailserver setup:
http://www.ceics.com/support/google-mail-smtp-relay-solution

EDIT - in a failed installation, I found three things that needed fixing that I didn't do quite right that you may want to pay attention to in the future:
1) if on a machine with a firewall, you'll need to open up port 25
2) the port for sending to gmail must be 465.  I tried 587 - which should work, but it didn't.  I tried this on 12/27/12.  I can't explain that - it was the only change I made so I know that the port number needed to be 465.
3) In Advanced -> IP ranges, you'll want the "firewalled subnets" or whatever you call the range that includes your copier - you'll want priority to be the highest number (meaning if the highest number is 20, you'll want your copier's priority to be 20 or 25 or higher).  I'm used to MX records, so I figured lower would be a higher priority, but that was not true.

Sunday, September 13, 2009

scan to folder on Konica Minolta Bizhub series

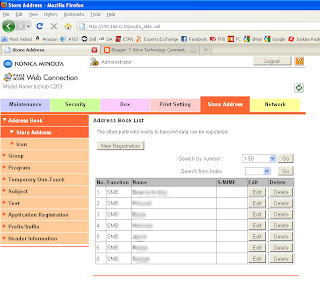
Here's how to set up scanning to a folder on a Konica Minolta Bishub machine.

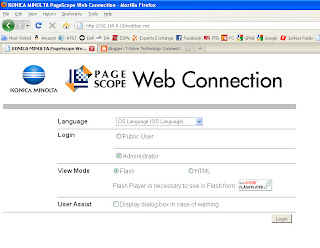
Go to the IP in either Firefox or IE (does not work in Chrome). It might go straight to a web interface. If so, hit log out. Then log in as administrator. The password is 12345678 (by default).


Then go to the store address tab.


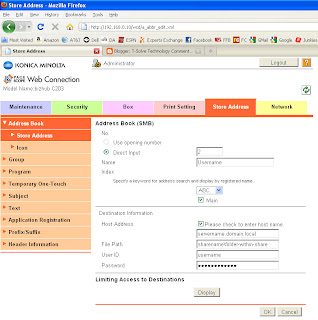
Click Edit or New Registration and put in info as shown here . . . (this assumes you want to scan straight to a certain folder for each user and name the button for each user's folder). Note that the filepath begins with the share name and does not use the UNC path or the server name in it. For username and password, you can use the user's username and password or you can create a unique one just for the copier in AD.