I found this link for how you can forward emails that are spam or phishing that are not caught by the Office365 junk filter for further analysis:
https://technet.microsoft.com/en-us/library/jj200769%28v=exchg.150%29.aspx?f=255&MSPPError=-2147217396
Showing posts with label Office365. Show all posts
Showing posts with label Office365. Show all posts
Wednesday, October 25, 2017
Friday, July 7, 2017
Storing Mac data storage folders (desktop, documents, etc) in a cloud syncing folder (Dropbox, Google Drive, etc)
This page talks about methods for moving data storage locations to cloud syncing folders which allows for real time backup of those data storage locations. I use this process often for smaller clients who need/want backup on the cheap. This is particularly easy if they're already using Dropbox or Google Drive or have an Office365 account with OneDrive storage.
https://www.howtogeek.com/204595/how-to-move-special-folders-on-os-x-to-cloud-storage/
https://www.howtogeek.com/204595/how-to-move-special-folders-on-os-x-to-cloud-storage/
Monday, March 20, 2017
Enabling two factor authentication in Outlook 2013 with Office365
This post will go over what you need to do to enable two factor authentication in Office 2013 with a backend Office365 mail server (so you don't need to use app passwords). This process sets up the 'modern authentication' login window for Office 2013 programs.
Step one - from a Powershell command prompt run this command (info from here):
Set-OrganizationConfig -OAuth2ClientProfileEnabled $true
Step three - enable 2FA from the Office Portal:

Step one - from a Powershell command prompt run this command (info from here):
Set-OrganizationConfig -OAuth2ClientProfileEnabled $true
Step two - Add group policy to push modern authentication registry entries to Office 2013 computers
After step two is complete, I'd recommend waiting a couple days for all the users to get these settings added to their registry via group policy..

Wednesday, December 21, 2016
Setting Up Two Factor Authentication in Office365
This post will go over the steps a person will need to take in setting up two factor authentication for Office365. As of 2016, two factor authentication is the the most common option for secure access to cloud based systems.
Step 1: Ask your administrator to enable two factor authentication (can only be enabled by an administrator)
Step 2: Go to https://account.activedirectory.windowsazure.com/profile/
Step 3: Log in with your email address

Step 4: Click Set up now

Step 5: Set up the second authentication method. For 99% of people, this will be a text message to your cell phone

Step 6: Click Contact me. You'll a code sent to your cell phone. Enter that code on the next page to verify successful receipt of the code. Click Verify after entering the code.

Step 7: Click Done (you can ignore the other text in the window)

Step 8: Click Additional Security Verification

Step 9: Confirm that the settings look right (they should look right if you've gotten this far)

Step 10: Click on "app passwords"

Step 11: Click Create

Click 12: Give the name to the app password you're creating. With near certainty, the first one you'll want to create will be for Outlook. You'll be creating an app password for *each* non-web based program/device you use. You cannot reuse app passwords. Let's say you've got a tablet, a phone, two different Outlook installations (on two different computers), and a Skype for Business installation. That's five different programs and you'll need five separate app passwords. I recommend naming each app password for the program you'll be using. For example, you might call them Outlook laptop, Outlook desktop, iphone 7, Galaxy S7, iPad, Skype for Business, or something similar.

Step 13: Use the app password the system gives you and track it. Within the next two hours, your devices (Outlook or phone or tablet etc) will prompt you for a password for your email account. Instead of using your regular password, you'll use the app password. You *cannot* reuse app passwords, so you should be sure to 1) make as many passwords as you need and 2) track them until you first use them (the app passwords are useless after you first use them).

Wednesday, September 28, 2016
SSL certificate errors on Outlook for Mac caused by Outlook bug
Outlook 2016 for Mac has a bug in it that causes Outlook to show a security error when connecting to an Exchange server even when the Exchange server and all parts are properly configured. This post will talk about what the error looks like and how to make the error disappear.
When opening or configuring Outlook for Mac that connects to an Exchange account, users will get an error like this:

You can hit "continue" to get through the error, but to remove the error forever more . . .
Hit "Show Certificate"
Check the box for "Always trust"
Hit Continue
Enter your password at the prompt that comes up.

Sunday, September 18, 2016
Removing email proxy addresses from AD (helpful if you sync your AD to Office365)
Right now, this is a partial post while I get the PowerShell scripting components together. I needed to remove all the proxy addresses for a certain domain in advance of removing that certain domain from our Office365 account. Because we sync our local AD with Office365, I need to remove the proxy addresses from the local AD. I could do this manually, of course - which is long and inefficient. The crucial command I used is this one:
I ran this from "Active Directory Powershell for Windows PowerShell"

Because I'm not good enough with PowerShell yet, here's what I did. I tried to remove the domain from the account in Office365. Office365 returned all the mailboxes that had the domain as aliases. I copied and pasted the list of mailboxes to Excel. I extracted the mailbox user names from the list and made a single column in Excel of those mailbox names (in my case - our domain uses a username of joe.smith as the username for Joe Smith) so the single column included Joe.Smith. Then I did a mail merge with that list to create a get that PowerShell command listed above to be individualized with each username. And then I copied and pasted those commands into PowerShell. Not ideal. Ideally, you'd have a foreach command that would run though all AD users, but this is a story about what I did at this moment. I'll update this post.
Set-ADUser username -Remove
@{ProxyAddresses="smtp:username@domain.com"}
I ran this from "Active Directory Powershell for Windows PowerShell"

Because I'm not good enough with PowerShell yet, here's what I did. I tried to remove the domain from the account in Office365. Office365 returned all the mailboxes that had the domain as aliases. I copied and pasted the list of mailboxes to Excel. I extracted the mailbox user names from the list and made a single column in Excel of those mailbox names (in my case - our domain uses a username of joe.smith as the username for Joe Smith) so the single column included Joe.Smith. Then I did a mail merge with that list to create a get that PowerShell command listed above to be individualized with each username. And then I copied and pasted those commands into PowerShell. Not ideal. Ideally, you'd have a foreach command that would run though all AD users, but this is a story about what I did at this moment. I'll update this post.
Tuesday, August 9, 2016
Creating an anti-spoofing rule in Office365
Here's how to create a mail flow rule in Office365 to send spammers who spoof your domain to the online quarantine. These instructions are applicable ass of 8/9/16. Typically, these spoofed messages will go to your users' junk e-mail boxes, but this can still lead to confusion, so we don't want these messages to go to junk e-mail at all.
In the Exchange Admin Center, go to Mail Flow:

Add a new mail flow rule:

Hit More Options near the bottom of the page:

Give the rule a name of "Spoof Check." Tell the rule to apply this rule if sender is outside of the organization and the sender's domain is [your public domain] and do the following: deliver the message to the hosted quarantine.

Wednesday, November 18, 2015
Fixing November 2015 issue of iphone users sending calendar acceptances over and over again
In October and November 2015, we found that in some cases, users would send calendar appointment acceptances over and over again to the meeting owner. We think this is caused by the newest iPhone IOS update. Here's the fix that Microsoft recommends:
1. Configure affected user's mailbox in Outlook in Online Mode (disable cache).
2. Download MFCMAPI tool from http://mfcmapi.codeplex.com
3. In O365 web portal from the Exchange Admin Center, open the affected user's profile, then select Mailbox Features > Mobile Devices > Disable Exchange ActiveSync.
4. Remove the mailbox from the user's mobile device.
5. On the system with Outlook is configured in Online Mode, run MFCMAPI.
6. Click OK to close the Usage Notes screen.
7. Click Session > Logon.
8. Select the Outlook profile set up for the affected user.
9. Double-click the display name of the affected mailbox.
10. In the new window, expand the Root Container menu.
11. Expand ExchangeSyncData menu.
12. For each listed AirSync device, right-click the item, then select Delete Folder and select the checkbox for Hard Deletion > OK.
14. Once all listed AirSync devices have been successfully deleted, from the main navigation select Actions > Exit.
15. Select Session > Logoff.
16. Select QuickStart > Exit.
17. In O365 web portal from the Exchange Admin Center, open the affected user's profile, then select Mailbox Features > Mobile Devices > Enable Exchange ActiveSync.
18. Add the mailbox to the user's mobile device.
19. The issue should be resolved and may be monitored via the Sent Items folder of the configured Outlook.
Wednesday, April 29, 2015
Get list of active users and last logon time in Office365 PowerShell
This PowerShell command will give you the list of users in the system and their last logon time:
Get-mailbox -resultsize unlimited| Get-MailboxStatistics | select displayname, lastlogontime | sort-object lastlogontime
Get-mailbox -resultsize unlimited| Get-MailboxStatistics | select displayname, lastlogontime | sort-object lastlogontime
Thursday, April 16, 2015
Office365 Whitelist and Blacklisting
This is a consolidation of information I've found on blacklisting and whitelisting in Office365:
Whitelisting or blacklisting by IP address:
https://blogger.googleusercontent.com/img/b/R29vZ2xl/AVvXsEhQ_oRstwdgLIv5vRX6VQlGA0QGL4ZcT6-2iEWPnTmyyWeV3iI-LV_4J-64rlxpEQ4VlBbag6HA_STunISwGfyvWvJxDHAh9Rm8g3iiK1wPO29nIZBNK7NpOlkxbmtw3M9COO_lSjb_hNU/s1600/20131125.king.net.office365.howto.whitelist.JPG
Exchange Admin Center -> Protection -> Connection Filter -> connection filtering by IP address
Whitelist by domain name:
http://www.mattwharton.co.uk/2014/08/how-to-whitelist-a-domain-in-office-365-exchange-online.html
or
http://www.office365tipoftheday.com/2013/12/02/whitelist-a-domain-to-bypass-exchange-online-protection-spamfilter/
Exchange Admin Center -> Mail Flow -> Create New Rule -> Bypass spam filtering -> Apply this rule ... if the sender domain is
Powershell configuration:
https://support.microsoft.com/en-us/kb/2545137?wa=wsignin1.0
Thursday, February 12, 2015
Manual setup of Office365 (on Exchange 2013)
If for some reason autodiscover isn't working or you can't put autodiscover in place, here are manual instructions for setting up Outlook for Office365 (when using Exchange 2013):
http://blogs.perficient.com/microsoft/2014/01/manually-configuring-outlook-for-office-365-exchange-2013/
http://blogs.perficient.com/microsoft/2014/01/manually-configuring-outlook-for-office-365-exchange-2013/
Saturday, October 4, 2014
SSL cert errors for old Exchange server after you've already moved to Office365
My users began getting SSL cert errors in Outlook after the SSL cert on my old mail server expired. This was weird because I had moved my company's email to Office365 more than a year earlier. It looked something like this:

Quick research led to the idea that Outlook was looking at the autodiscover for the internal server when connected to the LAN as opposed to the CNAME record that pointed to autodiscover.outlook.com
The fix . . .
First run this on your old mail server in an Exchange shell to see where your autodiscover is currently pointing:
Get-ClientAccessServer | fl AutoDiscoverServiceInternalUri
If it's pointing to your internal server with the expired certificate, that's a problem. To fix that, run this command in the Exchange shell (assuming your server is named server1):
Set-ClientAccessServer -Identity "server1" -AutoDiscoverServiceInternalUri "https://autodiscover.outlook.com" -AutoDiscoverSiteScope "Mail"
or I could disable internal autodiscover via this command (assuming your server is named server1):
Set-ClientAccessServer -Identity “server1″ -AutoDiscoverServiceInternalUri $NULL
Friday, August 22, 2014
Configuring Office365 on difficult XP computer
This entry will have no value to anyone else. It's a specific situation for my own notes. On the computer named Vostro1500-INTE, the Outlook 2010 has consistent trouble with configuring the Office365 account.

I tried all these things.
In the end, I found that the fix was to 1) create a new Windows profile and 2) disable the crappy Trend Micro antivirus. Of note, I recreated the profile at first wihtout disabling AV and I had trouble configuring email - so perhaps disabling the AV was necessary.
I tried all these things.
- Create new mail profile
- Setting the login/email address to username@domain.onmicrosoft.com
- Set DNS servers to 8.8.8.8 instead of internal DNS
- Create and connect to VPN without split tunnel
In the end, I found that the fix was to 1) create a new Windows profile and 2) disable the crappy Trend Micro antivirus. Of note, I recreated the profile at first wihtout disabling AV and I had trouble configuring email - so perhaps disabling the AV was necessary.
Sunday, August 10, 2014
Using a Windows Server as an authenticated relay server to Office365
If you've got an on-premise device that doesn't support TLS and you're on Office365 (or other outsourced Exchange), you're in a bind. Most of the info here comes from this article:
http://www.configureoffice365.com/configure-office-365-smtp-relay/
I'm copying and pasting parts of it below, simplifying parts, and adding my own hints. This presumes Windows Server 2008. Some Windows 2012 steps are here.
Part 1 - Add IIS if not already installed
Part 3 - Add TLS certificate
http://www.configureoffice365.com/configure-office-365-smtp-relay/
I'm copying and pasting parts of it below, simplifying parts, and adding my own hints. This presumes Windows Server 2008. Some Windows 2012 steps are here.
Part 1 - Add IIS if not already installed
- In Server Manager, select Add Roles.
- On the Select Server Roles page, select Web Server (IIS) and select Install.
- Select Next until you get to the Select Role Services page.
- In addition to what is already selected, make sure that ODBC Logging, IIS Metabase Compatibility, and IIS 6 Management Console are selected and then select Next.
- When you’re prompted to install IIS, select Install. You may need to restart the server after the installation is finished.
Part 2 - Install SMTP
- Open Server Manager and select Add Features.
- On the Select Features screen, choose SMTP Server. You may be prompted to install additional components. If that’s the case, select Add Required Features and select Next.
- Select Install. After the installation is finished, you may have to start the SMTP service by using the Services snap-in for the Microsoft Management Console (MMC).
- Office 365 requires TLS encryption and for this server to use TLS, it must have a certificate installed.
- In order to do this the Web Server (IIS) role and IIS Management Console must be installed (needs to be added via Server Manager -> Add Roles).
- To create the self-signed certificate: (Start->Administrative Tools->Internet Information Services (IIS) Manager->Select Host->Server Certificates->Create Self-Signed Certificate)
Part 4 - Configure SMTP server relay
- Start->Administrative Tools->Internet Information Services (IIS) 6.0 Manager.
- Click on the ‘+’ next to your host name.
- Right-click on the [SMTP Virtual Server…] and select Properties. It’s now time to step through each of the tabs to configure the SMTP relay.
- General Tab: The IP address should be set to (All Unassigned)
- Access Tab: Click Authentication… and select the Anonymous access check box.
- Access Tab: Click Connection… Select ‘All Except the list below’ and leave the list below blank. This allows any device inside your firewall to access this relay.
- Access Tab: Click Relay… Select ‘All Except the list below’ and leave the list below blank. This allows any device inside your firewall to access this relay.
- Messages Tab: No changes. The default works well.
- Delivery Tab: Click Outbound Security… Select Basic authentication and enter the username and password that is used to send e-mail to the external server (Office 365 in this case). The user name must be a fully qualified (ex: user@companyname.com) valid Office 365 user licensed for Exchange. Check TLS encryption.
- Delivery Tab: Click Outbound connections… Set the TCP port to 587.
- Delivery Tab: Click Advanced Delivery and set the Fully-qualified domain name box to the name of the local server that is acting as the relay (ex: myserver1.domain.local). Set the Smart host the full-qualified name of the Office 365 SMTP Server (as of 8/6/14 - this is smtp.office365.com in all cases). Make sure the “Attempt direct…” box is unchecked.
- LDAP Routing and Security Tabs: No changes to these areas.
- Now there has to be a remote domain setup with the Office 365 domain name in it. Click the ‘+’ next to the [SMTP Virtual Server…] item
- Right-click on Domains and select New-Domain which will launch a Wizard.
- Select Remote and Next.
- Enter the name of the Office 365 vanity domain (ex: mycompany.com)
- Now this remote domain will be setup very similarly to the overall SMTP server. Right-click on the new domain name and select Properties.
- Select Forward all mail to smart host and enter the same Office 365 SMTP Server as above (ex. smtp.office365.com)
- Click on Outbound Security and configure the same as above. Select Basic authentication and enter the username and password that is used to send e-mail to the external server (Office 365 in this case). The user name must be a fully qualified (ex: user@companyname.com) valid Office 365 user licensed for Exchange. Check TLS encryption
- Repeat steps 14 through 19 where step 16 is *.com for the domain
- Repeat steps 14 through 19 where step 16 is *.org for the domain
Part 5 - Configure the on-premise device
- Configure the on-premise device (copier, phone system, etc) with the IP address for the Windows server you have been working with as the SMTP server
- For email address, enter the same address you entered in Part 4 step 9
- Use port 25 and no authentication of any kind and no SSL or any other kind of encryption
Troubleshooting tips
- Make sure the firewall on the Windows server allows connections on port 25. A good test is "telnet 10.0.0.18 25" where 10.0.0.18 might be the IP address of the server you're using as the relay
- I've seen instances where the first emails can take up to 90 minutes to relay. I cannot explain this. But it is true.
- As a test, try using Windows Mail or Outlook as a test mechanism. If it succeeds through your test program, it's just a matter of configuring your device (copier, etc) properly
- On the relay server, there can be error messages located here if things aren't coming through after 90 minutes - C:\inetpub\mailroot\Badmail
Monday, July 14, 2014
Moving Legacy X.500 addresses to Office 365 from on-premise servers
I migrated from SBS 2003 to Office365, but I didn't use one of the standard method. I recreated the users in the cloud and impored PSTs via Outlook. This works fine except for the problem with internal routing where internal addresses use X.500 addresses and generate NDRs when sending to internal staff.
This is a helpful article on using the NDR text to create the X.500 address, though I found its instructions not quite right.
http://support.microsoft.com/kb/2807779
In my case, I found a slight adjustment needed to make it work.
Let's say you're getting an NDR that says:
IMCEAEX-_O=DOMAIN_OU=FIRST+20ADMINISTRATIVE+20GROUP_CN=RECIPIENTS_CN=JSMITH@namprd07.prod.outlook.com
For the user jsmith, create a new Exchange email address with a type of X500 (no period in the type - it is X500 not X.500), and enter the value with adjustments as suggested by MS in the article above:
Replace any underscore character (_) with a slash character (/).
Replace "+20" with a blank space.
Replace "+28" with an opening parenthesis character.
Replace "+29" with a closing parenthesis character.
Delete the "IMCEAEX-" string.
Delete the "@mgd.domain.com" string.
Add "X500:" at the beginning.

This is a helpful article on using the NDR text to create the X.500 address, though I found its instructions not quite right.
http://support.microsoft.com/kb/2807779
In my case, I found a slight adjustment needed to make it work.
Let's say you're getting an NDR that says:
IMCEAEX-_O=DOMAIN_OU=FIRST+20ADMINISTRATIVE+20GROUP_CN=RECIPIENTS_CN=JSMITH@namprd07.prod.outlook.com
For the user jsmith, create a new Exchange email address with a type of X500 (no period in the type - it is X500 not X.500), and enter the value with adjustments as suggested by MS in the article above:
Replace any underscore character (_) with a slash character (/).
Replace "+20" with a blank space.
Replace "+28" with an opening parenthesis character.
Replace "+29" with a closing parenthesis character.
Delete the "IMCEAEX-" string.
Delete the "@mgd.domain.com" string.
As an example, I turned this:
IMCEAEX-_o=ExchangeLabs_ou=Exchange+20Administrative+20Group+20+28FYDIBOHF23SPDLT+29_cn=Recipients_cn=e0c06d4eee7e4ec8b8a38d105ca7793c-joe@namprd08.prod.outlook.com
into this:
/o=ExchangeLabs/ou=Exchange Administrative Group (FYDIBOHF23SPDLT)/cn=Recipients/cn=e0c06d4eee7e4ec8b8a38d105ca7793c-joe
In the case above, I moved an Exchange mailbox from one account to another (via exporting the old mailbox to PST and importing into a new mailbox on a new account).
Wednesday, May 28, 2014
display shared Exchange calendars on an iphone/Droid
I'm documenting a solution for display shared calendars (for example your boss's calendar) on an iphone/Droid. I tried this via two Office365 accounts (on two different domains), and it worked well.
Links to explain the process:
http://www.stevieg.org/2010/11/shared-exchange-calendars-on-ios-devices/
http://community.office365.com/en-us/f/158/t/13878.aspx
In essence, you share your boss's Exchange calendar as an iCal calendar (this does require a publishing process via right clicking on the calnendar and choose Share -> Publish this calendar). In my tests, a web link to an .ICS files was created. Send to the employee and the iphone (in my tests) will properly interpret the link as a shared calendar and add it as a calendar in calendars.
Monday, March 24, 2014
altering retention policy for deleted items in Office365
By default, Office365 mailboxes retain deleted items for 30 days. This is a bit short, I think. I typically like to make this limit 90 days to one year. Here are the powershell commands needed to run to make that happen (365 days in this example):
PS C:\scripts> enable-organizationcustomization
PS C:\scripts> Set-RetentionPolicyTag "Deleted Items" -AgeLimitForRetention 365
This is based on getting into PowerShell, based on my directions here:
http://t-solve.blogspot.com/2013/11/how-i-configure-script-to-get-into.html
PS C:\scripts> enable-organizationcustomization
PS C:\scripts> Set-RetentionPolicyTag "Deleted Items" -AgeLimitForRetention 365
This is based on getting into PowerShell, based on my directions here:
http://t-solve.blogspot.com/2013/11/how-i-configure-script-to-get-into.html
Sunday, March 23, 2014
setting up Blackberry services on Office365
These are the steps to enable Blackberry services on Office365 (running Exchange 2013).
From the admin console, go to service settings -> mobile
Click on Enable service
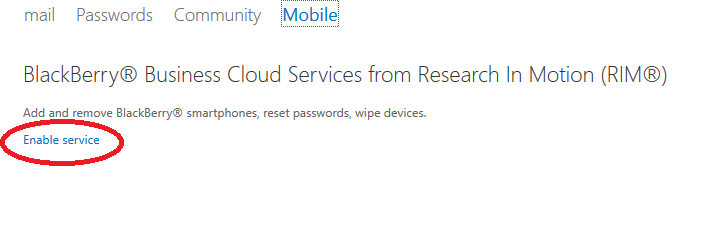
From there, you can manage the service. Of note, as of 3/23/14, I'd get an error when I tried to manage the Blackberry service from IE 11, but I was able to use Chrome. Pretty weird.

From the admin console, go to service settings -> mobile

Click on Enable service
From there, you can manage the service. Of note, as of 3/23/14, I'd get an error when I tried to manage the Blackberry service from IE 11, but I was able to use Chrome. Pretty weird.
Wednesday, November 20, 2013
how I configure a script to get into a Powershell CLI for editing Office365 properties
I was setting up a laptop to use a script to get into a Powershell CLI and wanted to document what I used to get in.
You'll need to download two items to enable PowerShell:
1) Microsoft Online Services Sign-in Assistant
2) Azure AD Module for Windows PowerShell
from here:
https://technet.microsoft.com/library/dn975125.aspx
You may need to install .net 3.5 from turn windows features on/off.
Then I created a folder on the root C called scripts. In there, I created a file called office365.ps1 with these contents:
---
Import-Module MSOnline
$O365Cred = Get-Credential
$O365Session = New-PSSession –ConfigurationName Microsoft.Exchange -ConnectionUri https://ps.outlook.com/powershell -Credential $O365Cred -Authentication Basic -AllowRedirection
Import-PSSession $O365Session
Connect-MsolService –Credential $O365Cred
---
Then I make edits by opening powershell. Navigate to c:\scripts and run office365.ps1. Of note, you might also need to enable remote execution (Set-ExecutionPolicy RemoteSigned) like this:

From there, I use the commands I described in this post:
http://t-solve.blogspot.com/2013/01/office365-shell-commands-for-reference.html
When I need to run a Powershell script, I open powershell, navigate to c:\scripts, and I run office365.ps1 like this:

Sunday, March 17, 2013
forwarding email with autoreply on Office 365
One of my clients' preferred way to handle a departed employee is to set up an autoreply and forward the email to another staff member. This doesn't work as it should on Office 365. With a regular on-premise Exchange server, you can set up the autoreply in the mailbox and configure forwarding with still delivering the message to the departed user's mailbox, and it works as intended.
With Office 365, the forwading happens, but the autoreply doesn't go out even though the mailbox is configured to receive the message. Very annoying.
To get around this, I had to configure the autoreply and set up an Outlook rule to forward the messages.
While researching this, I found this semi-helpful page on dealing with terminated employees when you have Office 365:
https://www.cogmotive.com/blog/office-365-tips/dealing-with-terminated-employees-in-office-365
Subscribe to:
Posts (Atom)