Wednesday, June 30, 2010

BES Express installation thoughts

RIM released a new version of their free server side enterprise software in early 2010. There are some big benefits of the new version (Blackberry Enterprise Server Express 5.0 over Blackberry Professional Server Express). Three huge advantages to the new version - 1) you can install it on 64 bit systems, 2) you no longer need the BB Enterprise plan on your devices to use Blackberry Enterprise (though you need BB Enterprise plan to do wireless activation - without it, you need to do wired activation through the desktop software), and 3) the server license is free and so are all device licenses.

You can get the software here:
http://na.blackberry.com/eng/services/business/server/express/?iid=BESX_Software_landing

The install wasn't too different from the previous version of the server software, but what's great is that RIM made a great installation guide and one that included a great screen shot walk-through.

Here's the text guide:
http://docs.blackberry.com/en/admin/deliverables/14335/BlackBerry_Enterprise_Server_Express_for_Microsoft_Exchange-Installation_and_Configuration_Guide--984521-0120054149-001-5.0.1-US.pdf


Here's the screen shot walk-throug:
https://www.blackberry.com/blackberrytraining/web/_content/indexExternal.html?cc=3731382d30323036335f42455358496e7374616c6c&cx=3230393930313031&cl=656e&cg=636f6e6669675f6c6f76655f707572706c652e786d6c

I was setting up BES Express on a Windows 2008 R2 machine with Exchange 2010 on it. The truth is that I had some trouble with the instructions. There were several things that the guide told me to do that I couldn't. I had trouble setting send as permissions to besadmin. I had trouble granting log on locally as a permission to besadmin (option was greyed out). I also couldn't get this command to work (I edited it as appopriate for my domain):
Add-ADPermission -InheritedObjectType User -InheritanceType Descendents -ExtendedRights Send-As -User "BESAdmin" -Identity "DC=,DC=,DC="

So in my case, luckily, I had already created another bedadmin account when my domain was a 2003 domain - but overall, minus the issues on this Exchange 2010 install, which I was luckily able to work around, the new version is a welcome change.

Tuesday, June 29, 2010

certificate mismatch when opening Outlook clients on Exchange 2007/2010 servers

After moving from Exchange 2003 to Exchange 2010, I found all my Outlook 2007 users on the LAN were getting this error:


The certificate it was referencing was the FQDN for the external name of the server. But it was accessing Exchange through the internal name. The solution was KB94072

Easy fix once you know what to look for. You're telling Outlook to use the external name - which is resolvable through internal DNS.

Monday, June 28, 2010

adding anti-spam features to single server Exchange 2010

I built a single Exchange 2010 box, as opposed to one with an edge server - and there were not anti-spam features present. Normally, you'd find the anti-spam features in edge transport in the Exchange Management Console (EMC).

But since there is no edge transport server, you can add the anti-spam functionality (so that it appears in Organization Configuration -> Hub transport and some in Server Configuration -> Hub transport. In each case, there's an anti-spam tab.

To add it, enter these commands:

1. Run the following command from the %system drive%/Program Files\Microsoft\Exchange Server\Scripts folder.

./install-AntispamAgents.ps1

2. After the script has run, restart the Microsoft Exchange Transport service by running the following command.

Restart-Service MSExchangeTransport

Sunday, June 27, 2010

adding VPN (RRAS) functionality to Server 2008 R2

If you're looking to add VPN/RRAS functionality to Windows 2008 R2, you won't find it called by either name. You need to add the role called Network Policy and Access Services (see screen show below).

Saturday, June 26, 2010

setting up Quickbooks Database Manager on Windows 2008 R2

Windows 2008 R2 is 64 bit only. Quickbooks Database Manager (hereto referred to as QDM) is only certified on 32 bit systems from what I've read. Setting aside how ridiculous it is in 2010 that Quickbooks doesn't officially support 64 bit systems, I had to make a small adjustment when configuring QDM on Windows 2008 R2.

When I ran the Quickbooks connection diagnostic tool, it said I had to open ports 8019 and 55338. Weirdly, I never had to do this for previous OSes, but c'est la vie.

Thursday, June 24, 2010

setting a Fortigate back to factory defaults using the console cable

The other day, I had lost connectivity to the Fortigate 50B that I had set up. Luckily, I had the console cable and a machine with a serial port that I could use. I was able to get into the CLI using that console cable and use these commands to set the device back to factory defaults:

Connect with a terminal program (like hyperterminal or putty)
connect with these settings:
8 bits
no parity
1 stop bit
9600 baud (the FortiGate-300 uses 115,000 baud)
Flow Control = None

log in as admin (perhaps with no password - perhaps with a password you set)

run this from the CLI:
exec factoryreset

Wednesday, June 9, 2010

removing Dell background on preconfigured servers

Dell prebuilt servers come with a wallpaper background that appears whenever you remote desktop to that box - which can be very slow over a low bandwidth connection. Found this registry change that will get rid of that default wallpaper:

Open Regedit and modify the following key
HKEY_USERS\.DEFAULT\Control Panel\Desktop\Wallpaper
Change value from \windows\system32\DELLWALL.BMP to blank, as in nothing, not the word ‘blank’.

Wednesday, June 2, 2010

removing rescue and recovery even if it doesn't appear in normal uninstall area

I loathe rescue and recovery. I've yet to find a place where I needed it, so I remove it. but occasionally, it's not in add/remove programs or whatever the equivalent is called in Vista/7. I read in a forum that you can also run the installer - which will allow you to uninstall.

The installer should be located in:

c:\swtools\apps\rnr

I haven't tested it yet, but just in case it works . . .

Tuesday, June 1, 2010

unable to allocate drive space for unallocated space - 2 TB parition size limits on NTFS

I'm building a Windows 2008 R2 x64 Standard box on a Dell PowerEdge T610 right now, and I ran into trouble with disk sizing that is begging to be documented.

This particular machine came with eight 600 GB SAS drives. I configured the RAID array as a RAID 5 with maximum allocation over seven of the drives and kept the final drive as a hot spare (I find that is most easily done by going into the RAID utility during the POST).

Anyway, when Windows finally came up, I had my 100 GB system partition, but I had two separate partitions of unallocated space, one was about 1.9 TB and the other was 1.3 TB. I could not allocate the 1.3 TB parition at all. It was useless to me.

I came across this article:
http://social.technet.microsoft.com/Forums/en/winserverhyperv/thread/b242efb4-302e-4fd2-aa0a-831fb56665e1

In short, it seems like an disks with the MBR partition style can only have 2 TB worth of usable partitions on it. The answer is formatting the drive as GPT partition style. But the problem is that a system partition cannot be GPT and a single drive can only have only one partition style. As such, you MUST have two virtual disks - one that will have the partition style MBR (for the system partition) and one that will have the partition style GPT (for the data partition).

So here is what I did with the help of a Dell tech:

create two virtual disks - one that is 100 GB (which will be the system partition) and one that is 3.5 TB (which will be the data partition)

To do this, press Control R (or whatever sequence is required to get into the RAID setup).
Delete all other virtual disks (press F2 when highlighting the disk and choosing delete).
Create a new virtual disk using the disks you want to use in both arrays (in my case that was 7 disks - disk 0 through disk 6) and change the allocation to be 100000 MB - the size of the virtual disk defaults to be the maximum size of all the drives together. You are changing that.
Do not add a hot spare here. We will add a global hot spare later in the PD Mgmt page.
Hit OK and then run a fast init of the of newly created virtual disk.
Under unallocated space (I believe), you'll now see the remaining space on the 7 drives. Highlight that unallocated space and hit F2 and create new VD. It will automatically select the 7 drives (disk 0 through disk 6) and default to the maximum size of all the remaining space. Hit OK. Do not make a hot spare here. We will do that later in the PD Mgmt page.
Run a fast init on the newly created virtual disk.
Now, hit control P until you're at the PD mgmt page. Assign a global hot spare.

Hit ESC until you are out and then begin your installation process.

With this done, you'll be able to install Windows on the first virtual disk - which will be the MBR partition style.

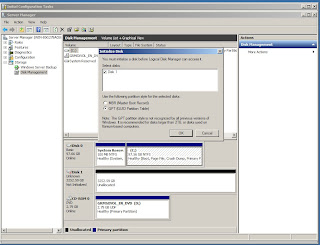
Then when Windows is up, you can go into disk management and assign the other disk as a GPT partition style. Here is what this looks like:


Of note, the Dell tech also spoke of a UEFI setting in the BIOS that some servers (including this one) have. With that setting enabled, one can create NTFS partitions larger than 2 TB, but I decided to go with this more universal option.