Showing posts with label SSL. Show all posts

Tuesday, October 31, 2017

Ruckus daemon.err wsgclient errors every 5 seconds in the logs (firmware 104.0.0.0.1347)

I'm running a Ruckus R600, and I was getting errors every 5 seconds in the logs that looked like this:

---
Oct  4 13:37:15 RuckusAP daemon.err wsgclient[528]: communicatorInit:364 Init connection failed, ret:124, connectRetry:86990

Oct  4 13:37:15 RuckusAP daemon.err wsgclient[528]: registration:594 Failed to init socket! ret:124 url:https://RuckusController/wsg/ap

Oct  4 13:37:20 RuckusAP daemon.err wsgclient[528]: crResloveAddrInfo:152 getaddrinfo failed, ret:-2/Name or service not known

Oct  4 13:37:20 RuckusAP daemon.err wsgclient[528]: cmrInit:138 Call 'crDefSocketInit()' failed, ip: port:443, ret:124/CR initial socket failed


---

I worked with Ruckus support and found that the Ruckus was reaching out to a cloud server that it was not registered with and receiving these errors.  Ruckus said that these errors were normal and not a problem.  They walked me through the fix.  You fix it by SSLing to the Ruckus (I use Putty for this) and then log in and run these commands (the commands I'm typing are in bold):

Please login: super
password :
Copyright(C) 2016 Ruckus Wireless, Inc. All Rights Reserved.

** Ruckus R600 Multimedia Hotzone Wireless AP: 971603500291

rkscli: set scg disable
OK
rkscli: set discovery-agent
Commands starting with 'set discovery-agent' :
set discovery-agent : set controller discovery agent {options}
                 -> disable/enable
                 -- Configure Controller Discovery Agent Info

rkscli: set discovery-agent disable
OK

Wednesday, September 28, 2016

SSL certificate errors on Outlook for Mac caused by Outlook bug

Outlook 2016 for Mac has a bug in it that causes Outlook to show a security error when connecting to an Exchange server even when the Exchange server and all parts are properly configured.  This post will talk about what the error looks like and how to make the error disappear.

When opening or configuring Outlook for Mac that connects to an Exchange account, users will get an error like this:


You can hit "continue" to get through the error, but to remove the error forever more . . .

Hit "Show Certificate"
Check the box for "Always trust"
Hit Continue
Enter your password at the prompt that comes up.


Friday, June 17, 2016

Configuring Outlook with a Google account (Google settings change needed after July 2014)

You need to an adjustment to your Google settings to get Google email working in Outlook.  I got this message when trying to set up a Google account in June 2016:

Your IMAP server wants to alert you to the following: Please log in via your web browser:
http://support.google.com/mail/accounts/bing/answer.py?answer=78754 (Failure)


The link above doesn't help as far as I can tell.

I got the answer from Microsoft's site:
https://support.microsoft.com/en-us/kb/2984937

On 7/15/14, Google disabled basic authentication, so you need to enable basic authentication to get Outlook (or Apple Mail or others) to successfully authenticate with Google accounts.

You can enable basic authentication here (assumes you are logged into your Google account):
https://www.google.com/settings/security/lesssecureapps


Saturday, October 4, 2014

SSL cert errors for old Exchange server after you've already moved to Office365

My users began getting SSL cert errors in Outlook after the SSL cert on my old mail server expired.  This was weird because I had moved my company's email to Office365 more than a year earlier.  It looked something like this:


Quick research led to the idea that Outlook was looking at the autodiscover for the internal server when connected to the LAN as opposed to the CNAME record that pointed to autodiscover.outlook.com

The fix . . .

First run this on your old mail server in an Exchange shell to see where your autodiscover is currently pointing:
Get-ClientAccessServer | fl AutoDiscoverServiceInternalUri

If it's pointing to your internal server with the expired certificate, that's a problem.  To fix that, run this command in the Exchange shell (assuming your server is named server1):
Set-ClientAccessServer -Identity "server1" -AutoDiscoverServiceInternalUri "https://autodiscover.outlook.com" -AutoDiscoverSiteScope "Mail"

or I could disable internal autodiscover via this command (assuming your server is named server1):
Set-ClientAccessServer -Identity “server1″ -AutoDiscoverServiceInternalUri $NULL


Friday, April 26, 2013

Firefox will not display SSL enabled web sites - Sendori alters SSL certificate appearance

I was working on a computer with Firefox 20.01, and the browser would not display any SSL secured websites - not google, not facebook, not Citibank, not anything.  Chrome and Internet Explorer had no trouble with these sites.

What I found was a piece of software called Sendori that was installed the previous day that had somehow altered the SSL cert information for each site.  Example is below for the cert that was showing for Google.


I tried uninstalling Firefox, opening a new profile, deleting cert8.db and all sorts of things.  But it was this Sendori program altering certificates that was my problem.  I could see that Sendori was listed as the certificate issuer and the "valid from" date was set today for all SSL sites.

I was able to uninstall Sendori from add/remove programs.

Monday, January 23, 2012

creating a CSR for a UCC SSL certificate on Exchange 2010 or SBS 2011

I installed an SBS 2011 box this weekend and I wanted to install a UCC SSL certificate on it. I get my certificates from godaddy, and this was the method I used in the Exchange Management Console to create the CSR that godaddy needed.


Here is the text in case that link ever gets moved or taken down:

Open the EMC

Select "Server Configuration" in the menu on the left, and then "New Exchange Certificate" from the actions menu on the right.
When prompted for a friendly name, enter a name by which you will remember this certificate in the future.

This name is not an integral part of your certificate request.

Under Domain Scope, you can check the box if you will be generating the CSR for a wildcard. Otherwise, just go to the next screen.

If you do select that box for a wildcard, skip to step 7.

In the Exchange Configuration menu, select the services which you plan on running securely, and enter the names through which you connect to those services, as prompted.

At the next screen, you will be able to review a list of the names which Exchange 2010 suggests you include in your certificate request. Review those names (using our SAN Name Help tool if necessary, and add any extra names at this point.

Your Organization should be the full legal name of your company.

Your Organization unit is your department within the organization.

If you do not have a state/province, enter the city information again.


Click "Browse" to save the CSR to your computer as a .req file, then Save, then Next, then New, and then Finish.
You should now be able to open the CSR as a notepad or wordpad file, and you will want to copy the entire body of that file into the online order process.

Friday, September 23, 2011

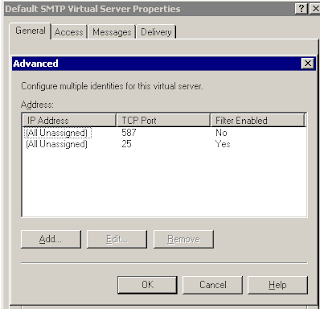
sending over port 587 with SSL on SBS 2003

When configuring external users to send over port 587 on Exchange/SBS 2003 - in the scenario that you have users that need to POP the server for whatever reason - here is what I think is the best way to do it:

In Exchange System Manager, go to Servers -> Server Name -> Protocols -> SMTP -> Default SMTP Virtual Server

Right click on the Default SMTP virtual server and choose properties.

Click on advanced and click add. Enter 587 in the TCP port and hit OK. It'll look like this when done:

Click on the access tab. Click on Certificate.

Put your existing 3rd party SSL certificate in place on this virtual server. This must be a 3rd part SSL certificate (like godaddy).

And that's it.

When configuring the email client, tell it to use authentication and SSL over port 587. In Outlook 2007, use AUTO for the type of encryption.


Sunday, February 27, 2011

turning off autorenew of SSL certs on godaddy

Godaddy turns on autorenew for all its certificates. I found this set of instructions on how to disable autorenewal:

  1. Login to GoDaddy
  2. Click My Account on the top listing
  3. Click “Renewals” on the left side of the page
  4. In the menu that pops up, click “Payments & Renewing Items”
  5. This brings up the page “Payment Profile” where all auto-renew items are listed
  6. Click the “Auto” column header and look for any items turned “On”
  7. Check the box next to any “On” items and click “Auto Renew ” at the top
  8. On the right side of page, check “Disable Auto Renew” then “Save Changes”.

I'm re-posting this info from here:

Wednesday, November 24, 2010

tool for editing/adding SSL certificates to Exchange 2007 / SBS 2008

This tool:


has been a great help to me in the management of multi-domain SSL certificates (UCC or SAN certificates). Particularly for SBS 2008, you need to use the Exchange shell to add a multi-domain SSL certificate, but this GUI tool will easily help you add it.

Saturday, July 10, 2010

adding a UCC (mulitple name) SSL certificate to SBS 2008

Adding a single name SSL certificate to SBS 2008 is pretty easy using the "add a trusted certificate" wizard in SBS 2008. But it's not as easy if you want a UCC SSL certificate - should you have a DNS host that doesn't support SRV records.

I found sembee's blog post on this exact topic here. His steps are a little convoluted, but here's a short version with just the need to know info:

You're not going to use the wizard. You'll use the powershell.

You'll go to Digicert's wizard for UCC creation:
https://www.digicert.com/easy-csr/exchange2007.htm

Then use the Powershell command it creates on your SBS 2008 box. It'll create a CSR file on the root of your C drive.

Take that CSR file to your SSL cert provider (godaddy or whoever). Buy the UCC cert and put in the CSR as needed.

After your cert is approved, download the cert and use this command to import the certificate:
Import-ExchangeCertificate -Path “D:\Shares\Install\SSL Cert\mail_ExternalDomaiName_com.crt” -FriendlyName “CompanyName UCC Cert”
(altered as appropriate of course for the actual path of your SSL cert)

Also follow the necessary instructions provided by the cert provider about intermediate certification authorities if applicable. Restart the MS Exchange Transport service and run an iisreset.

Then go back to the "add a trusted certificate wizard" in the SBS console and tell it that you'll use an already existing certificate and choose the cert that you just imported.


EDIT - this all makes sense, and I should see this working as I see the certificate in the personal store of the certificates MMC, so I should be able to add the UCC cert in the "add a trusted certificate wizard" - but I don't see it there, so I'm going to go the more manual route and follow these instructions:

http://www.xbarit.com/bradblog/2009/12/14/how-to-manually-install-an-ssl-certficate-on-sbs-2008/

Tuesday, June 29, 2010

certificate mismatch when opening Outlook clients on Exchange 2007/2010 servers

After moving from Exchange 2003 to Exchange 2010, I found all my Outlook 2007 users on the LAN were getting this error:


The certificate it was referencing was the FQDN for the external name of the server. But it was accessing Exchange through the internal name. The solution was KB94072

Easy fix once you know what to look for. You're telling Outlook to use the external name - which is resolvable through internal DNS.

Wednesday, March 19, 2008

setting up an SSL cert on an SBS machine with an ISA 2004 firewall

Setting up an SSL certificate on an SBS machine is not hard, and it's in a previous blog.

But there are some additional steps if you also have ISA 2004 on that machine. If you don't make the small, but necessary adjustments you get this error page:


Go into the web listeners in ISA Management and change the certificate that ISA is using
change the TO name in the web listeners (located in the firewall policies for each web publishing rule – SBS OWA web publishing rule, SBS Outlook via the internet web publishing rule, and several others) from publish.domain.local to mail.domain.com


And you also need to create a host file entry that pointed mail.domain.com to the INTERNAL ip, when you ping it normally, it resolves to the external IP.

Thursday, November 29, 2007

Implementing IMAP over SSL on Exchange

Last night, I put in IMAP over SSL for the first time. It was surprisingly easy.

More or less, it went like this:
Open up port 993 on the firewall to your Exchange server.
Make sure the IMAP service is set to automatic.
Then go to the Properties of the IMAP virtual server:
ESM -> Servername -> Protocols -> IMAP4 -> Default IMAP Virtual Server
Go to the Access tab
Hit Certificate -> Assign existing certificate -> and then you choose your SSL certificate (same one you have for OWA)

Then you need to turn off regular IMAP by requiring secured connections. Go to the properties of the Default IMAP Virtual Server and click on the Access tab. Click on Communication. Check the box for Require Secure Channel.

And really that was it. Then I was able to connect to IMAP over SSL. Of course client configurations are necessary, but that's relatively easy.

Installing a Turbo SSL Certificate from Godaddy on an SBS box

This is from my own notes (combined with Godaddy's) on how to install a Godaddy Turbo SSL Certificate on a Windows SBS box.

buy certificate from godaddy.com web site

log in to godaddy site

click on My Account

Under My Products, click on "Manage SSL Certificates"

Click "Set up Certificate"

Select certificate you purchased

Click "activate account"

if you've created a cert before with this account, log in, if not, create a new SSL account with a more secure 8 character password and the same username

click "request certificate"

Select certiticate again and click "request certificate"

Create your CSR request for IIS using these instructions:
# Go to Internet Information Services (IIS) Manager on your Exchange server
# Go to Servername -> Web sites -> Default web site . . . and Right mouse-click to select Properties.
# Click the "Directory Security" tab.
# Click the "Server Certificate." button (located in the "Secure communications" area)
# Click "Next" in the Welcome to the "Web Server Certificate Wizard" window.
# Remove the existing certificate
# Click the "Server Certificate." button (located in the "Secure communications" area)
# Click "Next" in the Welcome to the "Web Server Certificate Wizard" window.
# Select "Create a new certificate"; then click "Next."
# Select "Prepare the request now, but send it later" and click "Next."
# In the "Name and Security Settings" window, fill in the name field for the new certificate; then select the bit length (1,024 or higher). Click Next.
# For organization unit, you can put in "na" without quotes
# Verify the information in the request and click "Next."
# On the "Completing the Web Server" screen, click "Finish."
# Open the generated CSR file; then, using a plain-text editor, such as Windows Notepad, copy and paste the CSR into the online enrollment form.

godaddy will send an email to the administrative contact for the domain and if approved, the certificate will be sent via email.


then when you have the email with the link to the certificate, follow these instructions:

Installing SSL Certificate and the Intermediate Certificate Bundle (gd_iis_intermediates.p7b)

Before you install your issued SSL certificate you must download and install our intermediate certificate bundle (gd_iis_intermediates.p7b)on your Web server. You may also download the bundle from the repository.

Once you have downloaded and saved the certificate bundle, please follow the instructions below to install it.

Installing Intermediate Certificate Bundle (gd_iis_intermediates.p7b):

1. Select Run from the start menu; then type mmc to start the Microsoft Management Console (MMC).
2. In the Management Console, select File; then "Add/Remove Snap In."
3. In the Add/Remove Snap-In dialog, select Add.
4. In the Add Standalone Snap-in dialog, choose Certificates; then click the Add button.
5. Choose Computer Account; then click Next and Finish.
6. Close the Add Standalone Snap-in dialog and click OK on the Add/Remove Snap-in dialog to return to the main MMC window.
7. If necessary, click the + icon to expand the Certificates folder so that the Intermediate Certification Authorities folder is visible.
8. Right-click on Intermediate Certification Authorities and choose All Tasks; then click Import.
9. Follow the wizard prompts to complete the installation procedure.
10. Click Browse to locate the certificate file (gd_iis_intermediates.p7b).
11. Choose Place all certificates in the following store; then use the Browse function to locate Intermediate Certification Authorities. Click Next.
12. Click Finish.

Installing SSL Certificate

1. Select the Internet Information Service console within the Administrative Tools menu.
2. Select the Web site (host) for which the certificate was made.
3. Right mouse-click and select Properties.
4. Select the Directory Security tab.
5. Select the Server Certificate option.
6. The Welcome to the Web Server Certificate Wizard windows opens. Click OK.
7. Select Process the pending request and install the certificate. Click Next.
8. Enter the location for the certificate file at the Process a Pending Request window. The file extension may be .txt or .crt instead of .cer (search for files of type all files).
9. When the correct certificate file is selected, click Next.
10. Verify the Certificate Summary to make sure all information is accurate. Click Next.
11. Select Finish.

NOTE: If the Go Daddy root certificate is currently installed on your machine you will need to disable it from the Trusted Root Certification Authorities folder. Please follow the instructions below to do this:

1. Select Run from the start menu; then type mmc to start the Microsoft Management Console (MMC).
2. In the Management Console, select File; then "Add/Remove Snap In."
3. In the Add/Remove Snap-In dialog, select Add.
4. In the Add Standalone Snap-in dialog, choose Certificates; then click the Add button.
5. Choose Computer Account; then click Next and Finish.
6. Close the Add Standalone Snap-in dialog and click OK on the Add/Remove Snap-in dialog to return to the main MMC window.
7. If necessary, click the + icon to expand the Certificates folder so that the Trusted Root Certification Authorities folder is visible..
8. Expand the Trusted Root Certification Authorities folder.
9. Double-click the Certificates folder to show a list of all certificates.
10. Find the Go Daddy Class 2 Certification Authority certificate.
11. Right-click on the certificate and select Properties.
12. Select the radio button next to Disable all purposes for this certificate.
13. Click OK.

NOTE: Do not disable the Go Daddy Secure Certification Authority certificate located in the Intermediate Certification Authorities folder. Doing so will break the server, causing it to stop sending the correct certificate chain to the browser.